【MindStudio训练营第一季】MindX SDK 应用
前言
本次使用MindX SDK实现航拍地图风格转换
操作过程
下载工程代码文件
从gitee仓库中下载工程文件,工程目录为
1 | StyleTransfer |
准备模型文件
从ModelZoo中下载CycleGAN模型,其中提供了ONNX格式的模型,需要利用ATC转换为昇腾支持的om模型。
CycleGAN中有两个生成器实现两个域之间的相互转换,但本次实验中仅需要使用由航拍图到卫星图的转换,仅此仅对model_Ga.onnx文件进行转换,ATC转换前配置AIPP文件aipp_CycleGAN_pth.config。
1 | aipp_op{ |
输入图片格式为YUV420,大小为256*256,转换色域YUV->BGR并进行归一化。
ATC命令为:
1 | atc --framework=5 --model=./onnxmodel/model_Ga.onnx --output=sat2map --input_format=NCHW --input_shape="img_sat_maps:1,3,256,256" --out_nodes="maps" --log=debug --soc_version=Ascend310 --insert_op_conf=aipp_CycleGAN_pth.config |
得到om模型sat2map.om,放入工程文件中的models目录下。
运行结果
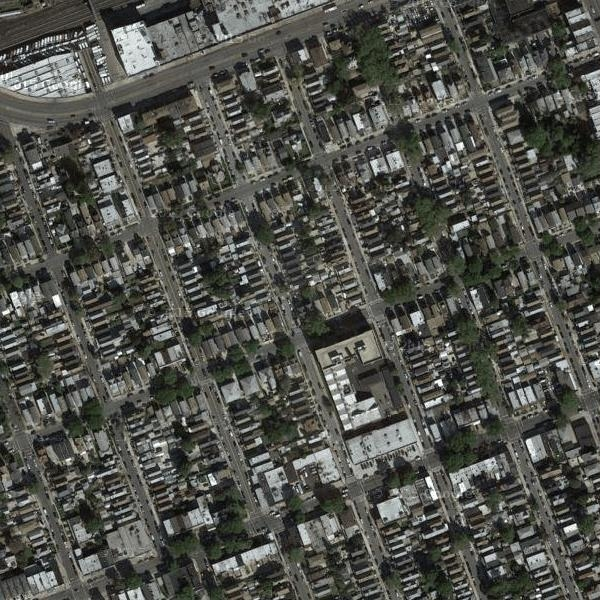
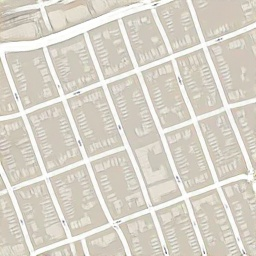
在main.py中修改测试图片路径和输出图片路径,在styletransfer.pipeline中修改mxpi_tensorinfer0的modelPath为../models/sat2map.om,运行得到

| 输入 | 输出 |
|---|---|
 |
 |
代码分析
应用流程
准备模型 -> 创建和初始化工作流 -> 读取图片 -> 推理图片 -> 得到推理结果 -> 后处理 -> 输出图片
- 提前有PyTorch转为昇腾om模型;
- 通过
StreamManagerApi创建并初始化流; - MindX SDK提供的
mxpi_imagedecoder解码图像数据,并通过mxpi_imageresize将图片大小转换为256*256; - 通过
mxpi_tensorinfer进行图片推理并通过appsink取出; - 后处理将推理结果数据转为图片保存。
main.py
-
定义全局变量
1
2
3
4
5MODEL_WIDTH = 256 # 输出图片宽
MODEL_HEIGHT = 256 # 输出图片高
RGB_TUNNEL_NUMBER = 3 # 通道数
NORMALIZE_MAX = 255.0 # 最大像素值 -
导入输入图片
1
2IMG_PATH = "../34_A.jpg" # 输入图片路径
PIPELINE = "../pipeline/styletransfer.pipeline" # 流程图 -
初始化流管理
1
2stream_manager = StreamManagerApi()
stream_state = stream_manager.InitManager() -
由pipeline创建流
1
2
3
4
5
6
7
8
9
10if os.path.exists(PIPELINE) != 1:
print("The pipeline does not exist.")
exit()
with open(PIPELINE, 'rb') as f:
pipeline = f.read().replace(b'\r', b'').replace(b'\n', b'')
pipeline_string = pipeline
stream_state = stream_manager.CreateMultipleStreams(pipeline_string) # 创建流
if stream_state != 0:
print("Failed to create Stream, ret=%s" % str(stream_state))
exit() -
传入图片
1
2
3
4
5
6
7
8
9
10
11
12
13
14
15STREAM_NAME = b"styletransfer"
PLUGIN_ID = 0
dataInput = MxDataInput() # 创建输入数据
if os.path.exists(IMG_PATH) != 1:
print("The test image does not exist.")
exit()
with open(IMG_PATH, 'rb') as f:
dataInput.data = f.read() # 读取输入图片
ret = stream_manager.SendData(STREAM_NAME, PLUGIN_ID, dataInput) # 传入流
if ret < 0:
print("Failed to send data to stream")
exit() -
获取推理结果
1
2
3
4
5
6
7
8
9
10
11
12
13
14keys = [b"mxpi_tensorinfer0"]
keyVec = StringVector()
for key in keys:
keyVec.push_back(key)
infer = stream_manager.GetResult(STREAM_NAME, b'appsink0', keyVec) # 获取结果
if infer.metadataVec[0].errorCode != 0:
print("GetResult error. errorCode=%d ,errorMsg=%s" % (
infer.metadataVec[0].errorCode, infer.metadataVec[0].errorMsg))
exit()
tensorList = MxpiDataType.MxpiTensorPackageList()
tensorList.ParseFromString(infer.metadataVec[0].serializedMetadata)
output_res_DANet = np.frombuffer(tensorList.tensorPackageVec[0].tensorVec[0].dataStr, dtype=np.float32) -
保存为图片
1
2
3
4
5
6
7
8
9result = output_res_DANet.reshape(RGB_TUNNEL_NUMBER, MODEL_WIDTH, MODEL_WIDTH) # 图片(C,W,H)
result = result.transpose(1, 2, 0) # (W,H,C)
result = result * NORMALIZE_MAX # 0-255
result = cv2.cvtColor(result, COLOR_RGB2BGR) # RGB -> BGR
result = cv2.resize(result, (MODEL_WIDTH, MODEL_HEIGHT)) # (256,256,3)
print("___________infer_finish_____________")
cv2.imwrite('../map.jpg', result) -
注销流
1
stream_manager.DestroyAllStreams()
流程编排

appsrc0
输入数据,这里设置缓存区大小
1 | "blocksize": "409600" |
mxpi_imagedecoder0
图片解码,设置输入图片格式和输出数据格式
1 | imageFormat: jpg |
mxpi_imageresize0
图片缩放,设置图片来源以及缩放图片的宽和高
1 | "dataSource": "mxpi_imagedecoder0", // 数据来自mxpi_imagedecoder0 |
mxpi_tensorinfer0
模型推理,设置数据来源和模型位置
1 | "dataSource": "mxpi_imageresize0", // 数据来自mxpi_imageresize0 |
appsink0
获取模式输出数据
1 | "blocksize": "409600" |
评论


